This post steps through setting up Amplify Auth with the Amplify UI React library in a Next.js SSR application. Once set up, we can restrict access to pages using the built-in hooks from the Amplify Authenticator on the client-side and use withSSRContext and Auth to restrict access to the API routes.
At this point, we’ll have all of the auth primitives to build a complete fullstack Next.js application. We can restrict access on the client or server (getServerSideProps) and also create API routes for additional business logic and processing.
As a bonus, we’ll create a nice UI structure with the Amplify UI primitive components. This will coincide with our use of the the Authenticator component. We’ll add top navigation bar component for signing in and out.
First, we’ll get the app set up with Amplify Auth.
- Restrict access with SSR
- Restrict access in Next.js API routes
- Restrict access in the client-side page
- Restrict access based on Cognito Groups
Then we’ll add some UI elements 🎨.
Create the app #
Create a new Next.js app or skip this step to start with the Amplify portion.
npx create-next-app amplify-auth-ssr
Initialize the Amplify project #
Initialize the Amplify project.
amplify init
I’m going to select the predetermined defaults for my setup.
? Enter a name for the project amplifyauthssr
The following configuration will be applied:

Project information
| Name: amplifyauthssr
| Environment: dev
| Default editor: Visual Studio Code
| App type: javascript
| Javascript framework: react
| Source Directory Path: src
| Distribution Directory Path: build
| Build Command: npm run-script build
| Start Command: npm run-script start

? Initialize the project with the above configuration? (Y/n) y
Add Amplify Auth #
Next, use the CLI to add authentication to the application.
amplify add auth
I’ll use the default configuration but I always find it helpful to step through the configuration options every few months. This is a good way to see what’s possible and configurable using Amplify with Amazon Cognito as the authentication backend.
And, create the resources in the cloud with amplify push.
amplify push

✔ Successfully pulled backend environment dev from the cloud.

    Current Environment: dev

┌──────────┬────────────────────────┬───────────┬───────────────────┐
│ Category │ Resource name          │ Operation │ Provider plugin   │
├──────────┼────────────────────────┼───────────┼───────────────────┤
│ Auth     │ amplifyauthssre08e6fed │ Create    │ awscloudformation │
└──────────┴────────────────────────┴───────────┴───────────────────┘
? Are you sure you want to continue? (Y/n) y
Awesome 🚀. Those steps will set up our authentication resources - now we just need to link them to the UI in the app. I’m going to use the Authenticator from the Amplify UI library. This is a drop-in component to handle the authentication flow leveraging the Amazon Cognito backend that we created above with the Amplify CLI.
There has been a lot of updates to Amplify UI recently and I suggest taking a look at the documentation. Not only is the Authenticator updated but the library now includes primitive components provide very nice building blocks for most UI use cases. The “cloud connected” components use AWS cloud resources but all of the other components can be used as standalone drop-ins.
Install Amplify UI #
I’m going to use the latest Amplify UI library for React.
yarn add aws-amplify @aws-amplify/ui-react
After installing, and with the Next.js dependencies, the package.json:
{
  "name": "amplify-auth-ssr",
  "version": "0.1.0",
  "private": true,
  "scripts": {
    "dev": "next dev",
    "build": "next build",
    "start": "next start",
    "lint": "next lint"
  },
  "dependencies": {
    "@aws-amplify/ui-react": "^2.20.0",
    "aws-amplify": "^4.3.25",
    "next": "12.1.6",
    "react": "18.2.0",
    "react-dom": "18.2.0"
  },
  "devDependencies": {
    "eslint": "8.17.0",
    "eslint-config-next": "12.1.6"
  }
}
Next, in _app.js, import the global styles. I’m going to use the defaults but theme overrides(with a ThemeProvider) can be adjusted here too.
// /pages/_app.js

- import '../styles/globals.css'
+ import '@aws-amplify/ui-react/styles.css';

function MyApp({ Component, pageProps }) {
  return <Component {...pageProps} />
}

export default MyApp
Next we’ll create _document.js in pages to configure the fonts.
  .
  ├── node_modules/
  ├── lib/
  ├── pages/
  │   ...
+ │    └─ _document.js
  ├── public/
  ├── styles/
  ├── next.config.js
  ├── .env
  ├── jsconfig.json
  ...

  └─ README.md
This template will be used for each page. This will bring in the fonts for Amplify UI.
// pages/_document.js

import { Html, Head, Main, NextScript } from "next/document";

export default function Document() {
  return (
    <Html>
      <Head>
        <link rel="preconnect" href="https://fonts.googleapis.com" />
        <link rel="preconnect" href="https://fonts.gstatic.com" crossOrigin />
        <link
          href="https://fonts.googleapis.com/css2?family=Inter:slnt,wght@-10..0,100..900&display=swap"
          rel="stylesheet"
        />
      </Head>
      <body>
        <Main />
        <NextScript />
      </body>
    </Html>
  );
}
Now that that everything is set, you can use Amplify Auth to authenticate users to the application.
Login page #
The Login page will use the withAuthenticator higher order component (HOC). The entire page will be the Authenticator component overlay. Create this login.js in the /pagesdirectory.
  .
  ├── node_modules/
  ├── lib/
  ├── pages/
  │    ...
+ │    └─ login.js
  ├── public/
  ├── styles/
  ├── next.config.js
  ├── .env
  ├── jsconfig.json
  ...

  └─ README.md
A nice UX quality of life is to capture the incoming route ref. Then, when the authStatus switches to authenticated, the user can be redirected to the page that they were attempting to access prior to logging in. For instance, an unauthenticated (or new) user may click on a subscription tier on a pricing page. Once they sign in, they will be redirected to back to the page where they can subscribe. This can be adapted for different patterns and use cases.
So, when a user is sent (or tries to access) to the Login page. If they are authenticated, they will be sent back to the referring page. If they are not authenticated, they will be prompted with the Authenticator login form. Once signed in, the authStatus will change and they will be sent back to the referring page if present.
This client-side approach uses the useAuthenticator hook from Amplify UI.
// /pages/login.js

import { useEffect } from "react";
import { useRouter } from "next/router";
import { withAuthenticator, useAuthenticator } from "@aws-amplify/ui-react";

function Login() {
  const router = useRouter();
  const { ref } = router.query;
  const { authStatus } = useAuthenticator((context) => [context.user]);

  useEffect(() => {
    if (authStatus && authStatus === "authenticated") {
      router.push(ref ? `${ref}` : "/");
    }
  });

  return <></>;
}

export default withAuthenticator(Login);
The login page will now show the Authenticator overlay.
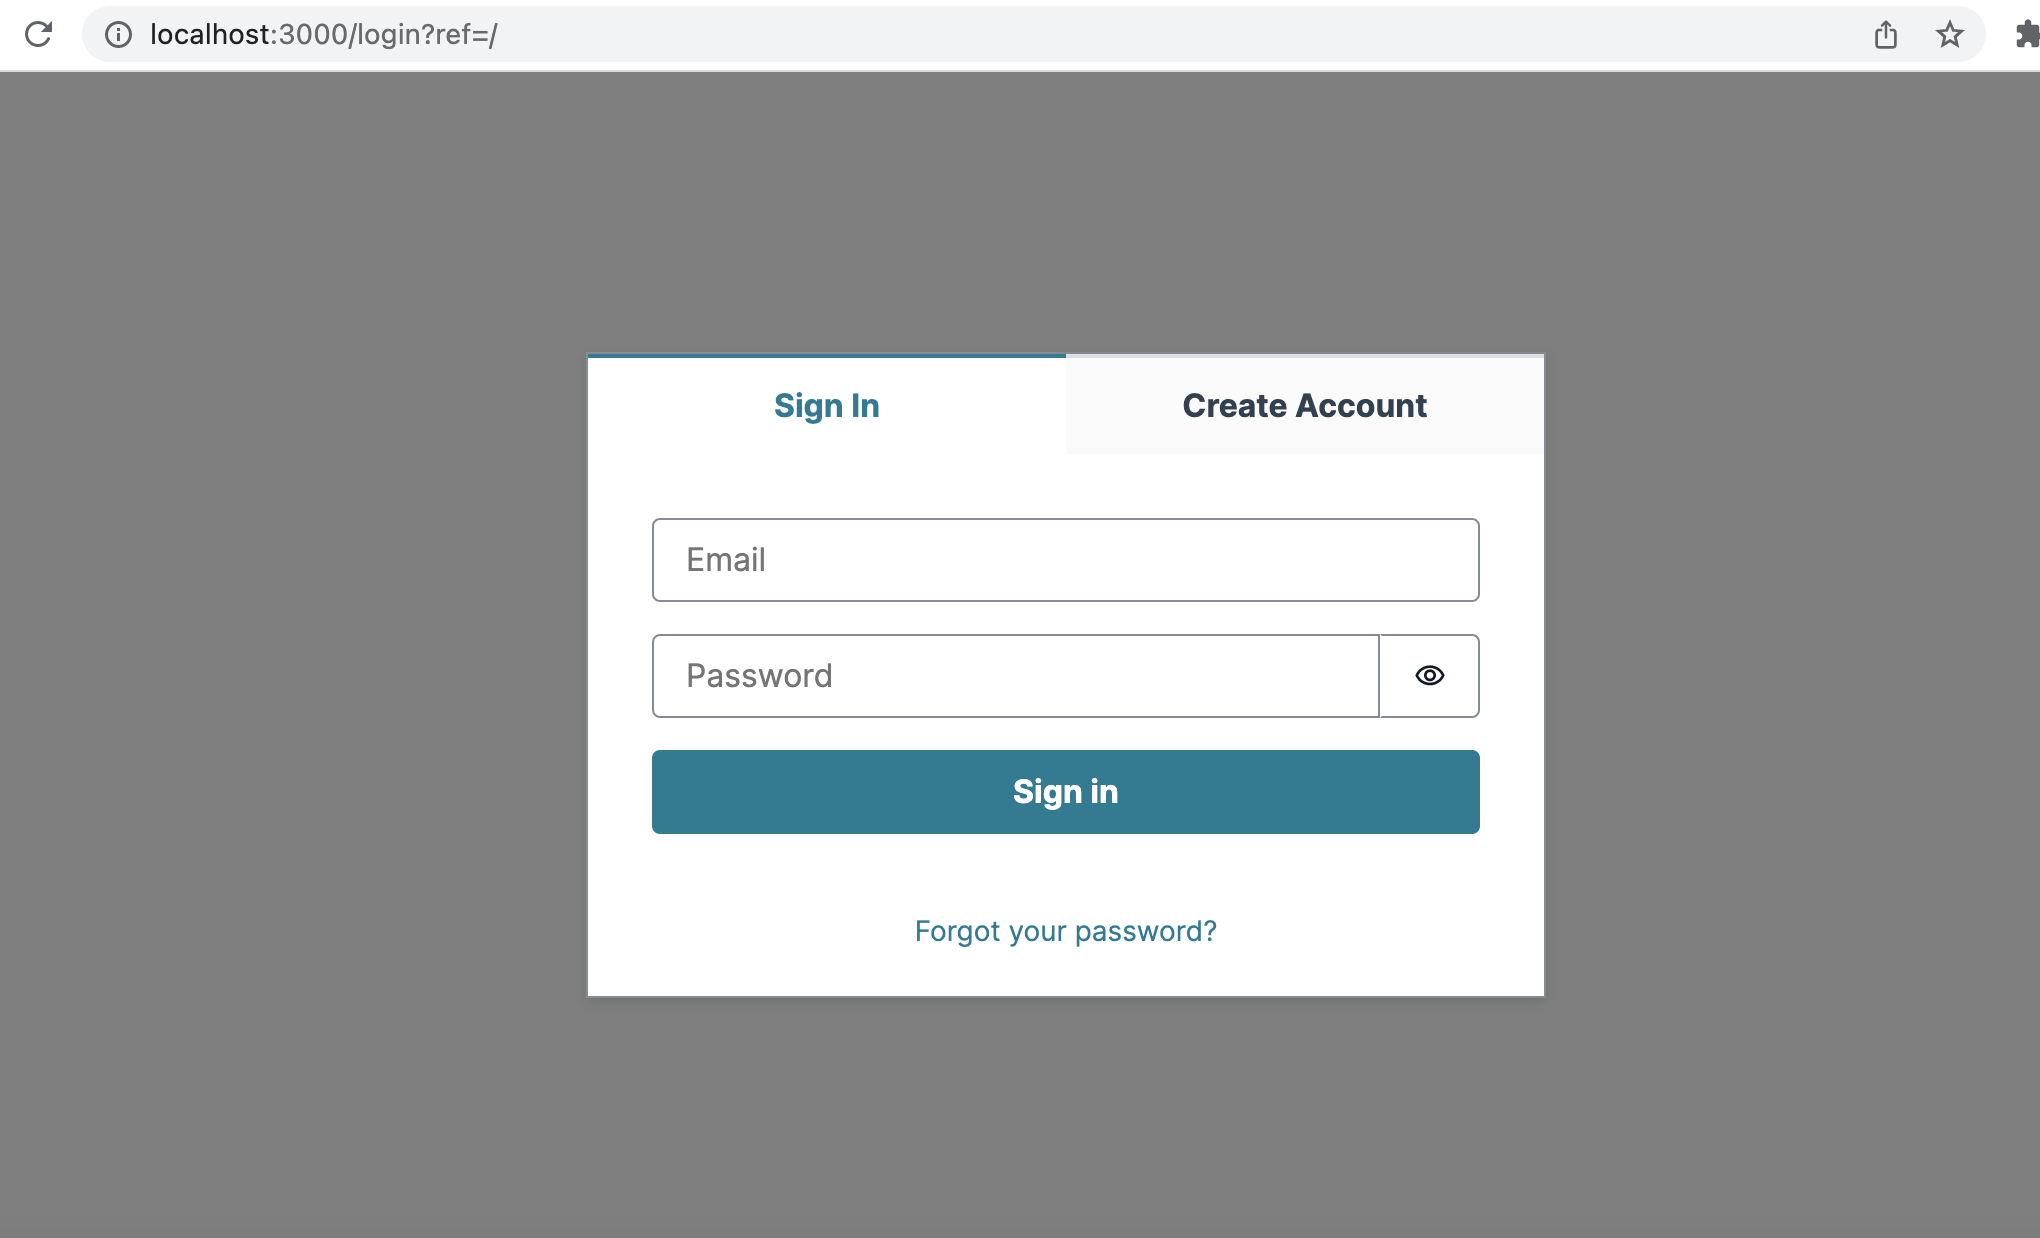
Also, notice the ref parameter in the URL, /login?ref=/. After login, the user will be redirected back to the index page (/).
Checking Authentication in SSR #
In Next.js SSR, we can use withSSRContext from Amplify Auth to destructure the authentication information from the incoming request object.
Then, we can check for a user using Auth.currentAuthenticatedUser(). In this case, the user will be redirected to the login page if not authenticated using a Next.js SSR redirect.
export async function getServerSideProps({ req }) {
  const { Auth } = withSSRContext({ req });

  let user;

  try {
    user = await Auth.currentAuthenticatedUser();
  } catch (err) {}

  if (!user) {
    return {
      redirect: {
        permanent: false,
        destination: `/login`,
      },
    };
  }

  return;
}
Protected API Routes #
Protecting Next.js API routes with Amplify Auth allows you to extend a fullstack application to the server side backend. This allows you to restrict calling this route for only authenticated users.
We’ll take a look at this in a future post to extend the Settings page below.
// /pages/api/protected-api.js

import { Amplify, withSSRContext } from "aws-amplify";
import config from "../../src/aws-exports.js";

Amplify.configure({ ...config, ssr: true });

export default async function protectedRoute(req, res) {
  const { Auth } = withSSRContext({ req });

  let user;
  try {
    user = await Auth.currentAuthenticatedUser();
  } catch (err) {
    return res.status(401).json({ message: "Unauthorized" });
  }

  //
  // insert your business logic here...
  //

  return res.status(200).json({ user: user.username });
}
Creating a Protected Settings Page #
Let’s create a restricted page that only the authenticated user can view. Add a new Settings.js page to the /pages directory.
  .
  ├── node_modules/
  ├── lib/
  ├── pages/
  │   ...
  │    ├─ login.js
+ │    └─ settings.js
  ├── public/
  ├── styles/
  ├── next.config.js
  ├── .env
  ├── jsconfig.json
  ...

  └─ README.md
In the Settings page, we’ll check for the user server side by using getServerSideProps. This will prevent the page from loading if the request is not authenticated.
Then, client side, we monitor authStatus. If that value changes and does not equal authenticated or configuring, the user will be redirected back to the Login page. We’ll wrap this in an effect to check on each update of authStatus.
configuring can almost be considered a loading state. Make sure to account for this to prevent the UI from quickly flashing as this changes on page load.
// /pages/settings.js

import { useEffect } from "react";
import { useRouter } from "next/router";
import { withSSRContext } from "aws-amplify";
import {
  useAuthenticator,
  Heading,
  View
} from "@aws-amplify/ui-react";

// we'll create this below
import Nav from "../components/Nav";

export async function getServerSideProps({ req }) {
  const { Auth } = withSSRContext({ req });

  let user;

  try {
    user = await Auth.currentAuthenticatedUser();
  } catch (err) {}

  if (!user) {
    return {
      redirect: {
        permanent: false,
        destination: `/login`,
      },
    };
  }

  return { props: {} };
}


export default function Settings() {
  const { user, authStatus } = useAuthenticator((context) => [context.route]);
  const router = useRouter();

  useEffect(() => {
    if (
      authStatus &&
      authStatus !== "authenticated" &&
      authStatus !== "configuring"
    ) {
      router.push("/login");
    }
  }, [authStatus]);


  return (
    <View padding="2rem" align="center">
      <Nav />

      <View marginTop="4rem">
        {user && authStatus === "authenticated" && (
          <main>
            <View width="80%" align="left">
              <Heading level={3}>Hey, {user?.attributes.email} 👋</Heading>
            </View>
          </main>
        )}
      </View>
    </View>
  );
There is an added Nav component in the page too. You’ll need to create this by adding the code below. This Nav component also checks for the user status and displays a different action button depending on the current state.
jsconfig.json.
Create a components directory and add the Nav.js component.
Add the Nav Bar #
  .
  ├── node_modules/
  ├── lib/
+ ├── components/
+ │    └─ Nav.js
  ├── pages/
  ├── public/
  ├── styles/
  ├── next.config.js
  ├── .env
  ├── jsconfig.json
  ...

  └─ README.md
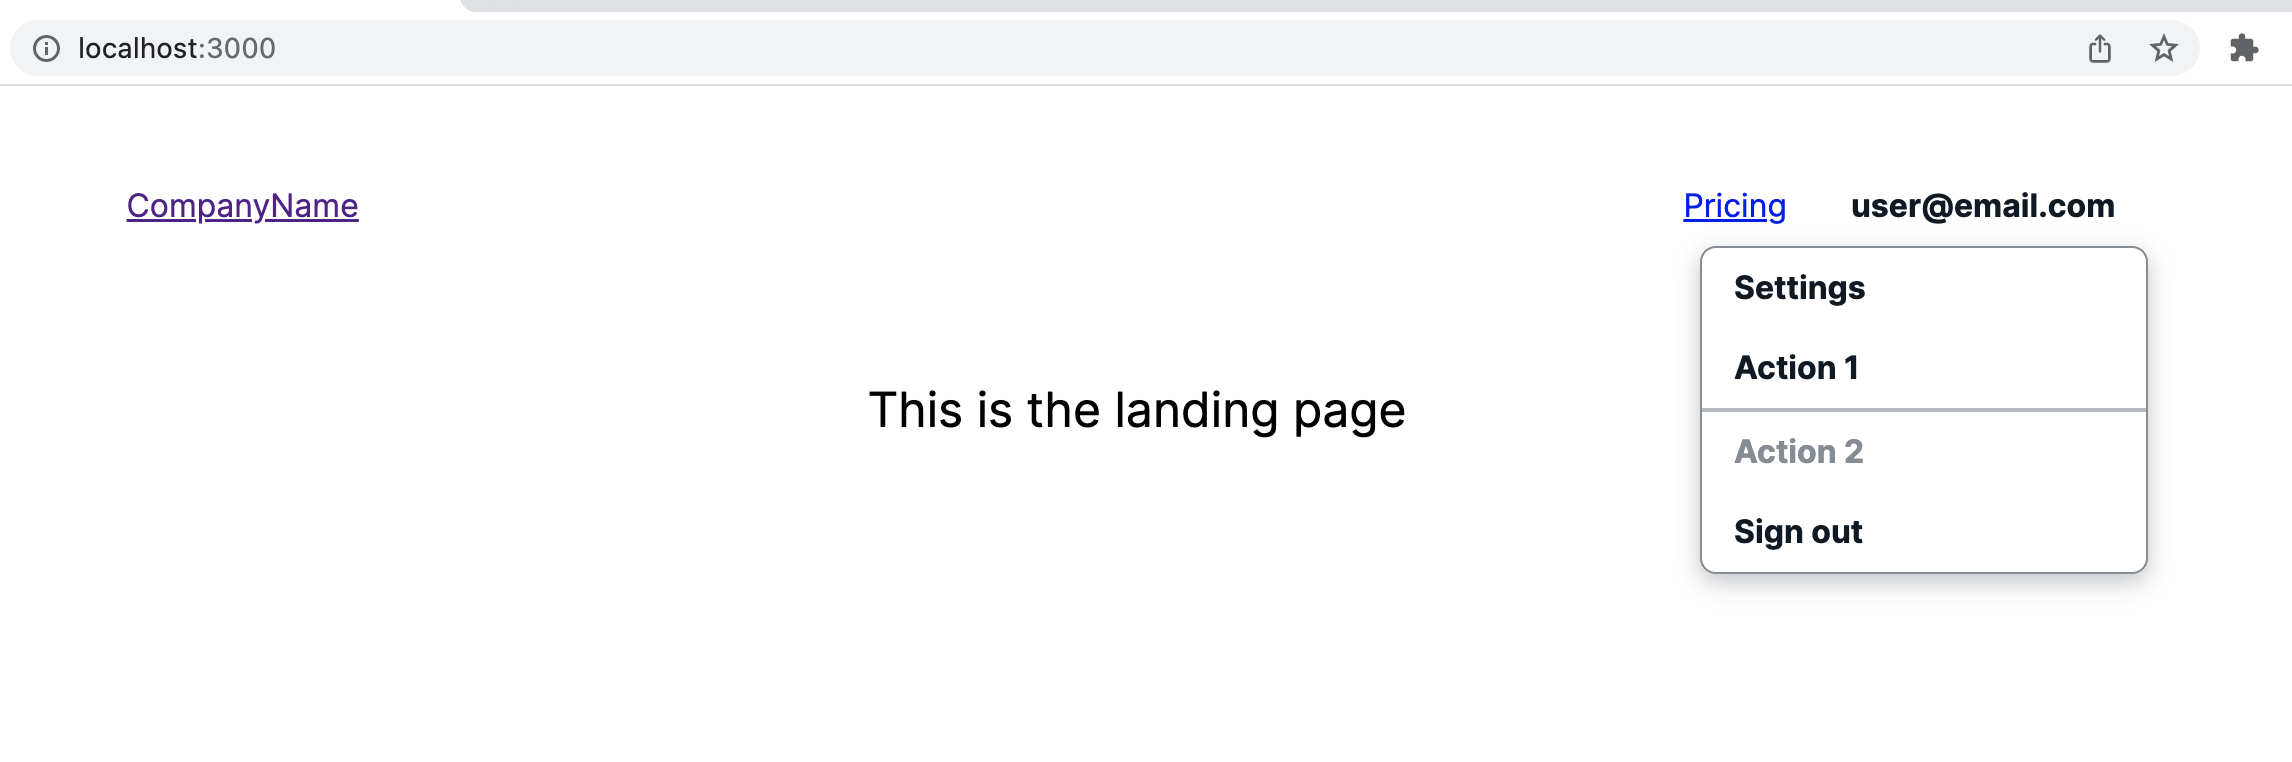
In Nav.js, we’ll add the UI dropdown menu to capture the authenticated user’s information.
import {
Button,
Flex,
Menu,
MenuItem,
MenuButton,
Divider,
useAuthenticator,
} from "@aws-amplify/ui-react";
export default function Nav() {
const router = useRouter();
const { user, signOut } = useAuthenticator((context) => [context.user]);
return (
<>
<Flex
justifyContent="space-between"
alignItems="center"
alignContent="center"
wrap="wrap"
gap="1rem"
width="80%"
>
<Link href="/">CompanyName</Link>
<Flex alignItems="center">
<Link href="/pricing">Pricing</Link>
{user && (
<Menu
menuAlign="end"
trigger={
<MenuButton variation="menu">
{user.attributes.email}
</MenuButton>
}
>
<MenuItem onClick={() => router.push("/settings")}>
Settings
</MenuItem>
<MenuItem>Action 1</MenuItem>
<Divider />
<MenuItem isDisabled>Action 2</MenuItem>
<MenuItem onClick={signOut}>Sign out</MenuItem>
</Menu>
)}
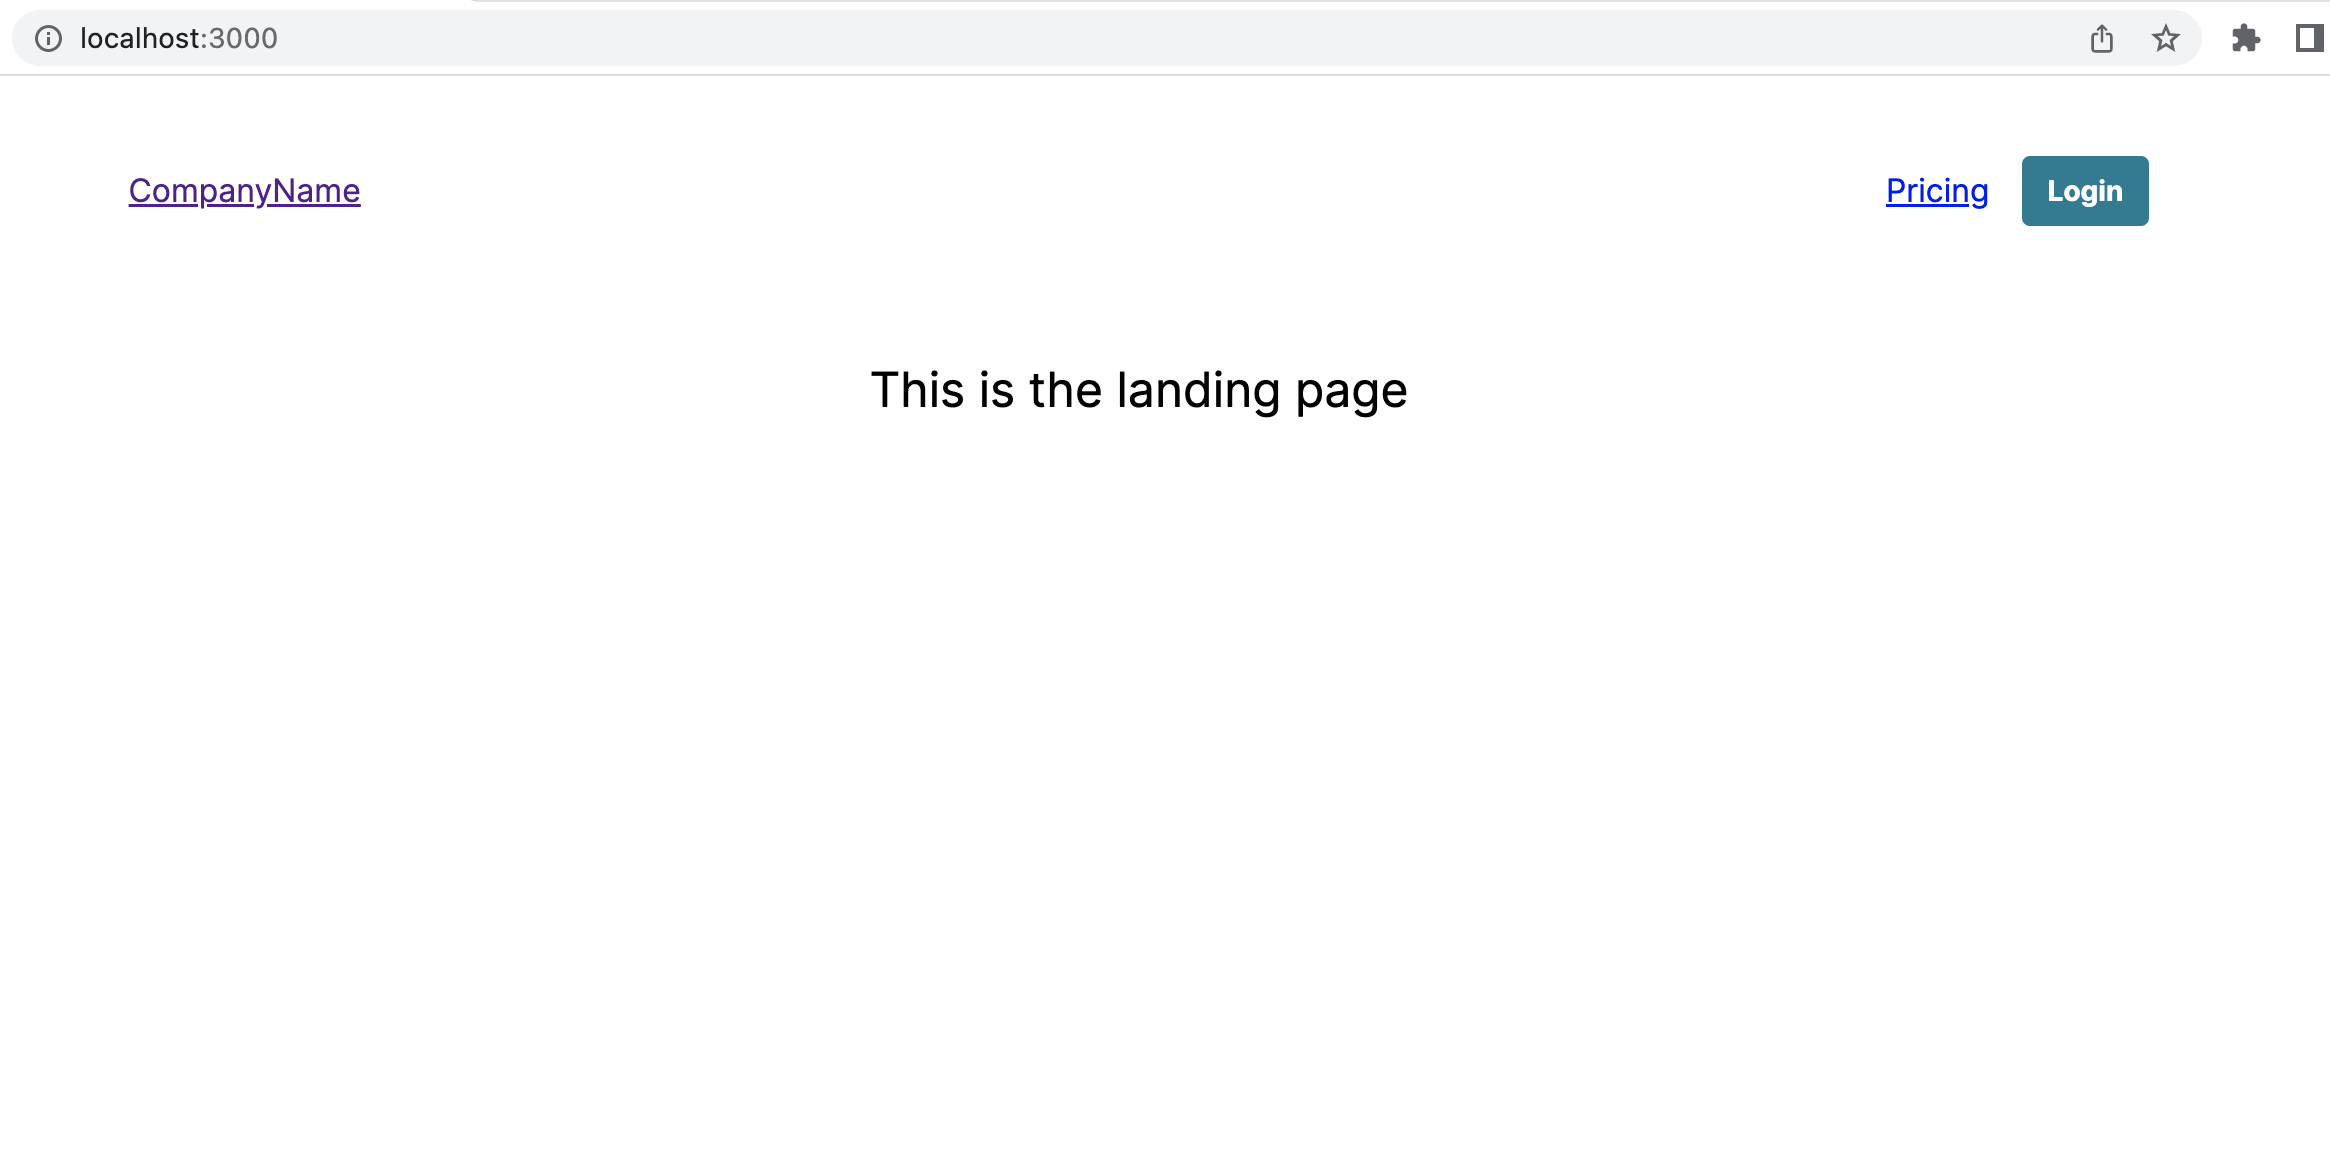
{!user && (
<Button
onClick={() => router.push(`/login?ref=${router.pathname}`)}
size="small"
variation="primary"
>
Login
</Button>
)}
</Flex>
</Flex>
</>
);
}
After signing in, the Nav bar will update with the user information.
Switching to the Settings page, the user is allowed to access and the page is rendered.
Group based access with Cognito Groups #
It’s also possible to grab the accessToken from the the authenticated user and use that information to show and/or hide parts of the application based on Cognito Groups.
Assuming the setup used in the examples above, you can access the cogito:groups key from the token payload.
const { user, signOut } = useAuthenticator((context) => [context.user]);

const groups = user?.getSignInUserSession()?.getAccessToken()?.payload[
  "cognito:groups"
];
The groups can then be used to restrict or toggle information.
For reference, the Cognito Access Token payload structure is:
{
  "sub": "aaaaaaaa-bbbb-cccc-dddd-eeeeeeeeeeee",
  "device_key": "aaaaaaaa-bbbb-cccc-dddd-eeeeeeeeeeee",
  "cognito:groups": [
    "admin"
  ],
  "token_use": "access",
  "scope": "aws.cognito.signin.user.admin",
  "auth_time": 1562190524,
  "iss": "https://cognito-idp.us-west-2.amazonaws.com/us-west-2_example",
  "exp": 1562194124,
  "iat": 1562190524,
  "origin_jti": "aaaaaaaa-bbbb-cccc-dddd-eeeeeeeeeeee",
  "jti": "aaaaaaaa-bbbb-cccc-dddd-eeeeeeeeeeee",
  "client_id": "57cbishk4j24pabc1234567890",
  "username": "janedoe@example.com"
}
Conclusion #
Nice! We now have a Next.js application that incorporates Amplify Auth to restrict user access to different sections of the application (Settings page, API routes) built with Amplify UI React components.
If you have any questions or feedback, feel free to reach out on [X @siegerts](https://x.com/siegerts).